2022年9月27日 星期二

Ubuntu 20.04 LibreNMS update PHP 7 to 8

先更新
sudo apt update
sudo apt upgrade


環境PHP

先依照
https://docs.librenms.org/Installation/Install-LibreNMS/#manual-update


安裝PHP套件與升級


apt install software-properties-common
add-apt-repository universe
add-apt-repository ppa:ondrej/php
apt update
apt install acl curl apache2 fping git graphviz imagemagick libapache2-mod-fcgid mariadb-client mariadb-server mtr-tiny nmap php-cli php-curl php-fpm php-gd php-gmp php-json php-mbstring php-mysql php-snmp php-xml php-zip rrdtool snmp snmpd whois python3-pymysql python3-dotenv python3-redis python3-setuptools python3-systemd python3-pip
安裝 PHP dependencies

su - librenms
./scripts/composer_wrapper.php install --no-dev
exit
設定Set timezone 
PHP 時區參考
https://www.php.net/manual/en/timezones.asia.php

Asia/Taipei
vi /etc/php/8.1/fpm/php.ini
vi /etc/php/8.1/cli/php.ini
設定OS系統時間一致

timedatectl set-timezone Asia/Taipei


跳過Mysql

設定 PHP-FPM


cp /etc/php/8.1/fpm/pool.d/www.conf /etc/php/8.1/fpm/pool.d/librenms.conf
vi /etc/php/8.1/fpm/pool.d/librenms.conf

Change [www] to [librenms]:

[librenms]

Change user and group to "librenms":

user = librenms
group = librenms

Change listen to a unique name:

listen = /run/php-fpm-librenms.sock

接下來跳過到

Cron job

cp /opt/librenms/librenms.nonroot.cron /etc/cron.d/librenms

這裡會有個錯誤須進入修改,與畫面一致(去cd )

vi /etc/cron.d/librenms


之後停用php7.x-fpm

systemctl disable php7.4-fpm.service

啟用php8套件

a2dissite 000-default a2enmod proxy_fcgi setenvif rewrite a2ensite librenms.conf systemctl restart apache2 systemctl restart php8.1-fpm


檢測與更新

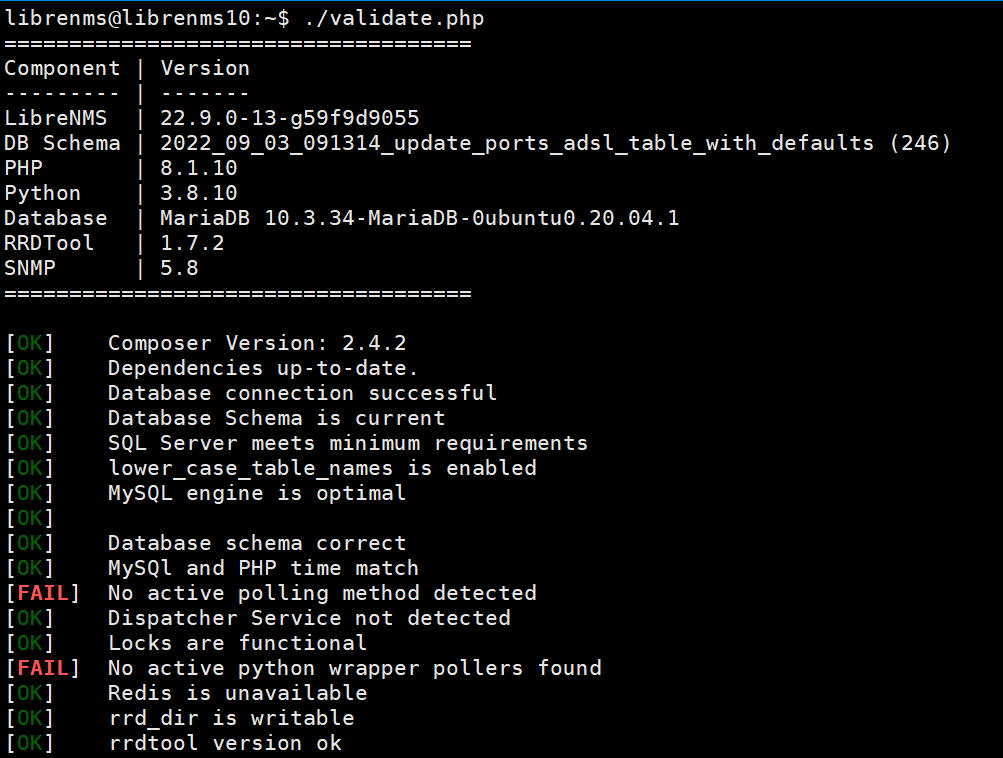
sudo su - librenms ./validate.php
./daily.sh


如果遇到以下錯誤,查看log為cronjob錯誤,如前圖修正:


No active polling method detected


vi /etc/cron.d/librenms


參考文獻
https://docs.librenms.org/Installation/Install-LibreNMS/#manual-update
https://community.librenms.org/t/issue-with-new-instalation/19332/6

2022年4月18日 星期一

LibreNMS Unifi controller 圖表相關解釋 snmp

在LibreNMS 看到相關圖表的量詞解釋筆記

網站翻了一堆討論,記下來處理


Wireless Clients 

連線數有分為NG和NA

分別對應Wifi 兩個頻段

2.4 Ghz radio = NG

5Ghz radio = AC = NA

SSID :WIFI SSID 連線數

cur:現在使用連線數

Min:最小連線數

Max:最大

Min&Max 區間為圖表設定的時間區間,圖中為24Hr

--

TX Power(發射功率)


無線基地台的訊號發射功率

如果環境是單台AP 則可以到18dBm 以上

如果是多台的環境,建議設定如下

12-14 dBm for 2.4 GHz 

18-20 for 5 GHz 

-------------

utilization (%) 頻道利用率


一樣分為2.4G(NG) 和5G(NA)

這張表主要是表達在各自頻道中,同樣的通道中訊號利用率

Other 代表非自己裝置(AP)的訊號使用,也就是雜訊,雜訊過高待表需要調整頻道或是規避減少

如圖所示 2.4G (NG)頻段干擾相當高


Total Util :所有使用率

Self RX:Client 連線進 AP 的下載率

Self TX:Client 連線進 AP 的上傳率

Other BBS Util:其他的利用率

#注意:這不等於頻寬的換算RX/TX是訊號發送率必定大於實際頻寬使用

AP TX Rate -----> STA (CPE) RX Rate = Download (from the STA/CPE perspective)

AP RX Tate <----- STA (CPE) TX Rate = Uplodad (from the STA/CPE perspective)


另外一個問題在於,如果同時段連線書低而RX&TX居高不下,

則代表SSID設定的連線可能有錯誤導致裝置不停的連線


參考文獻

https://community.ui.com/questions/WiFi-clients-loose-randomly-network-connection/7df080fd-4c60-4829-80e3-0a1ff78b8213

https://community.ui.com/questions/what-does-transmit-power-means-and-what-is-the-best/cddd0320-92bf-4936-9e3d-8c4e7d44a6cb

https://community.ui.com/questions/Access-Point-Channel-Utilization/92421630-2139-4c47-9f88-ddcd069778a4

https://community.ubnt.com/t5/The-Lounge/What-is-the-TX-RX-Rate/td-p/1586208

https://community.ubnt.com/t5/airMAX-General-Discussion/Difference-between-TX-RX-Rate-and-Actual-Throughput/td-p/296734

2022年4月6日 星期三

Epson L300 集墨 重新設定

笑死,N年前設定過後自己就忘了

還是要乖乖做筆記

網路上找到L500 (可選L300)


Adjprog

載點

How to Reset Epson L300 Printer:

  1. Turn on the printer and connect the USB cable
  2. Download Resetter Epson L300
  3. Extract file
  4. Open AdjProg.exe – Accept
  5. Particular adjustment mode
  6. Waste ink pad counter – OK
  7. Give checkbox Main Pad Counter and Platen Pad Counter
  8. Click Check – OK
  9. Click Initialization – OK
  10. Finish and then close the adjustment program.
  11. Turn off your printer and then turn on again.
  12. Done. ENJOY 🙂

2022年3月27日 星期日

CentOS 安裝Mysql 4.0筆記

 Cent7 checkinstall 需要改參數安裝,先放置

https://lbbxsxlz.github.io/2020/10/13/checkinstall-centos/


ubuntu 20 套件更新不支援 也須從下拉起


echo '/* Linuxthreads */' >> /usr/include/pthread.h


套件

yum install make cmake gcc kernel-devel


checkinstall


yum -y install wget gcc* make cmake libtool* openssl* pcre* ncurses ncurses-devel curses-devel libxml* bzip2 bzip2-libs bzip2-devel curl-devel curl expat-devel expat gdbm gdbm-devel libjpeg* libpng* libtiff* freetype* freetype imap imap-devel krb5-devel libmcrypt* libmhash-devel mhash* flex icu libicu libicu-devel libc libcu-devel libc-client-devel zlib-devel zlib libtiff-devel libtiff gd* pcre-devel pcre gdbm* pam-devel patch libcurl libcurl-devel libvpx libvpx-devel libXpm libXpm-devel t1lib t1lib-devel gmp-devel openldap-devel readline-devel libedit-devel libtidy libtidy-devel libxslt libxslt-devel db4-devel ibc-client uw-imap-devel uw-imap uw-imap-static libc-client-2007f wget vim


yum install compat


安裝


目錄/var/lib/mysql


設定


# Preconfiguration setup

 groupadd mysql

 useradd -r -g mysql -s /bin/false mysql

# Beginning of source-build specific instructions

tar zxvf mysql-VERSION.tar.gz

cd mysql-VERSION

mkdir bld

cd bld

cmake ..

make

make install

# End of source-build specific instructions

# Postinstallation setup

 cd /usr/local/mysql

 mkdir mysql-files

 chown mysql:mysql mysql-files

 chmod 750 mysql-files

 bin/mysqld --initialize --user=mysql

 bin/mysql_ssl_rsa_setup

 bin/mysqld_safe --user=mysql &

# Next command is optional

 cp support-files/mysql.server /etc/init.d/mysql.server

2022年3月18日 星期五

Proxmox VM 移除

 Proxmox VM 移除

原因:NFS等空間清除,但VM沒有移除,故無法刪除

先確認空間已無占用,無法連結


方法一:將硬體設定檔內 相關的硬體移除(CD-ROM、Disk)

若這樣依然無法移除,檢查是否有快照

快照無法用此方式移除,故須SSH進入主機節點,移除設定檔


位置

XXX=VMID 

方法:rm -f /etc/pve/nodes/*/*/XXX.conf

EX:rm -f /etc/pve/nodes/*/*/1024.conf


2021年9月28日 星期二

Librenms You can fix this with ./scripts/github-remove

cd /opt/librenms

./validate.php

錯誤訊息

[WARN] Your local git contains modified files, this could prevent automatic updates.
[FIX]:
You can fix this with ./scripts/github-remove
Modified Files:
bootstrap/cache/.gitignore
logs/.gitignore
rrd/.gitignore
storage/app/.gitignore
storage/app/public/.gitignore
storage/debugbar/.gitignore
storage/framework/cache/.gitignore
storage/framework/cache/data/.gitignore
storage/framework/sessions/.gitignore
storage/framework/testing/.gitignore
storage/framework/views/.gitignore
storage/logs/.gitignore

解法

./scripts/github-remove -d

2021年9月26日 星期日

Ubuntu 20.04 自動搜尋印表機關閉 Disable Auto-adding of Network Printers

Disable Auto-adding of Network Printers

服務名稱 cups-browsed 


systemctl stop cups-browsed

systemctl disable cups-browsed

結束


https://7thzero.com/blog/how-to-stop-ubuntu-20-04-from-auto-adding-network-printers